Page 4
Page 1 - Page 2 - Page 3 - Page 4 - Page 5 - Page 6 - Page 7 - Page 8 - Page 9 - Page 10
Page 11 - Page 12 - Page 13 - Page 14 - Page 15 - Page 16 - Page 17 - Page 18 - Page 19
Page 20 - Page 21 - Page 22 - Page 23 - Page 24 - Page 25
January 2005
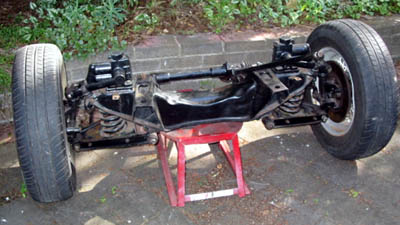
This is the front suspension and steering off the car. I will reattach it when the underseal has set.
The whole front crossmember shown here is held to the car by only four big bolts! The brake
calipers have been removed in this picture. I will rebuild the brakes and replace all the old
brake piping. When the engine is back in I will remove it all again (you need the weight of
the engine to compress and remove the springs) and repaint the crossmember and rebuild the
suspension.
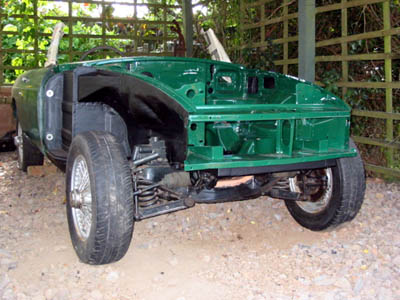
Front suspension back on the car. A bastard of a job by myself. I managed to scrape the new paint where
the steering passes through the bulkhead but nothing I can't touch up once I get the right colour
touch up paint. I have decided to leave the crossmember on the car and just remove things from it
since it was such a job getting it on the car. I can paint it in situ and have already done the top
of it (you can see the pink primer here) which will be covered by the sump with the engine in.
February 2005
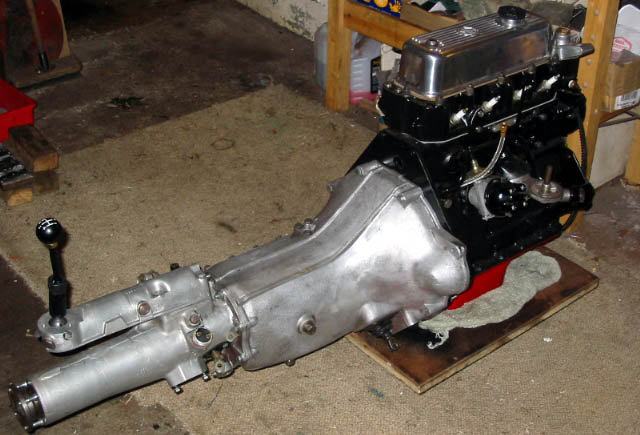
The engine and gearbox ready to go in the car. What a mission trying to get them together! I spent two
days trying to mate them up only to find in the end that the pilot bush that is in the end of the
the crankshaft was 0.2mm SMALLER than the first motion shaft end. Basically it would never fit! I
ended up extracting the old bush (using soggy toilet paper and a BFH). I got a new bush and also
borrowed an old first motion shaft to align the clutch. I then used the four long air cleaner to
carb bolts as guide pins and with a trolley jack under the rear of the box I lifted the front into
place. The box is heavy and weights 40kg. Once I had the shaft lined up I pushed it home until the
splines hit, I jiggled the output flange of the box (in 4th gear) until the splines matched up then
I was able to slide the box all the way home. Took half an hour from start to finish.
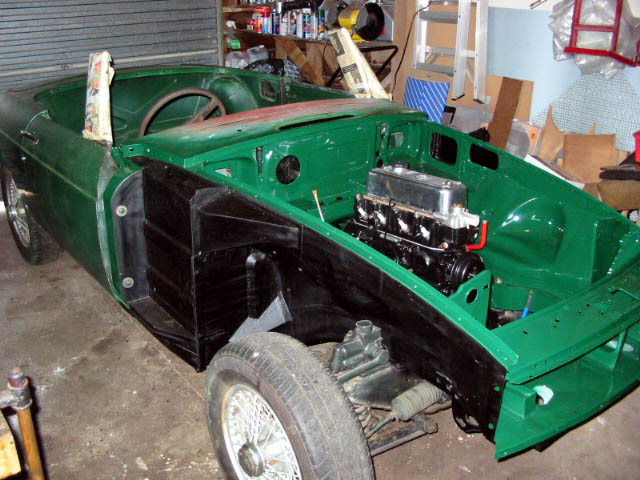
The engine and gearbox are back in the car. Finally! And we got the car up into the garage. Now things
should move along. Took about 2 hours to get the engine in from start to finish. Complicated by
the fact we weren't on flat ground. Getting the car into the garage wasn't too bad. We towed it up
road then I rolled down and turned into the driveway and made it halfway up the drive in one go. I
had made a hole in the back of the garage and had tied a 20m tow rope out to a tree at the end of
my garden. We winched the car the rest of the way. Such luxury having a lovely, hard concrete floor
to work on without worrying about the weather!
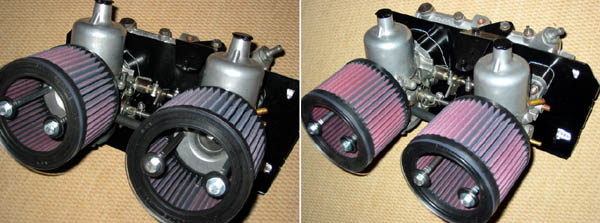
These are the K&N fliters I bought to replace the restrictive standard cans and paper filters. I will
get the car running on the standard filters then switch to these new ones since I may also need
to change the carb needles to richer ones (since these filters let more air through). I machined
up the clear end plates from 4.5mm thick polycarbonate so you can look down the carb throats when
the engine is running. I still need to make new spacer tubes out of brass to sleeve the long bolts.
March 2005
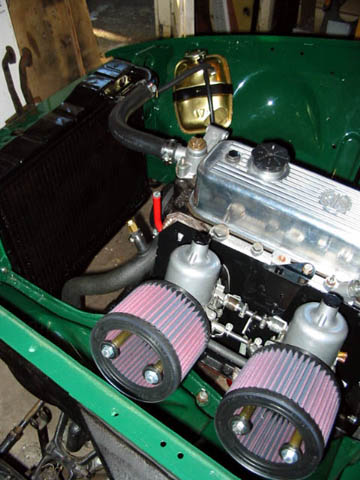
I got the carbs and radiator in. I had a bit of a problem which was that I had pre-assembled the carbs,
manifold and heatshield and used Hylomar on the gaskets. I found that you need to put everything
together on the car otherwise you can't get in to do up the nuts holding it all on. So I had to
pull everything apart again. In doing so I broke a fuel pipe off a carb and also found the
the heatshield was cracked. I fixed the carb by drilling out the old tube and pushing in a new
brass pipe. On the heatshield I gas welded up the crack and repainted it. Then a new set of gaskets
and I was back in business. The radiator overflow tank is brass so instead of painting I gave it
a polish and then clear coated it.

Tonight I drove across town to meet Ray who had offered me a free roll over bar for the car. I drove
the GT over since we knew it would fit in that so I could bring it home. Fits in the GT well. Fit
in the roadster isn't so good though. In that there is a vertical panel behind the cockpit. This is
very close to the seatbelt mounts that the bar fits too. You can see in the pics that the hole in
the mounting bracket really needs to be on the other side of the bar. I think I may need to modify
the bar by cutting off the existing plates and welding in new ones that fit the roadster better.
The vertical bar is bolted to the seatbelt mounts on the gearbox tunnel. The bar looks a bit high
but that is because the seats are sitting too low. They aren't mounted on their rails and spacers
but instead are just sitting on the floor of the car. I am considering getting some MX5 seats.
April 2005
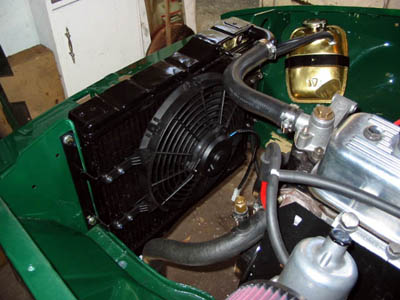
I decided not to use the original fans I rebuilt and instead bought a 12 inch fan to mount behind the
the radiator (which is a better position). I had to make two brackets to hold the fan in place.
I made these from 3mm steel and they attach under the two radiator mounting bolts on either side
of the radiator shroud. The fan will be powered from a relay.
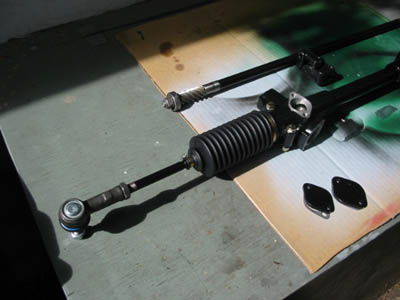
I stripped and rebuilt the steering rack which seems in good condition. As seems typical with the
later MGs the rack is different to what is shown in all the manuals. There are no shims under the
cover that holds the plastic block that presses onto the rack. The arrangement of the block and
spring are different too. I replaced the steering rack boots and the tie rod ends which were worn
out. I am waiting for a new pinion shaft oil seal before I can reassemble the rack and re-fill with
90w gear oil. I will have to do the steering alignment from scratch once I get the front suspension
rebuilt.
Page 1 - Page 2 - Page 3 - Page 4 - Page 5 - Page 6 - Page 7 - Page 8 - Page 9 - Page 10
Page 11 - Page 12 - Page 13 - Page 14 - Page 15 - Page 16 - Page 17 - Page 18 - Page 19
Page 20 - Page 21 - Page 22 - Page 23 - Page 24 - Page 25